Home
/ How To Use Transfer Tape Cricut : Then peel off the transfer tape you just laid down — it should peel up your vinyl with it!
How To Use Transfer Tape Cricut : Then peel off the transfer tape you just laid down — it should peel up your vinyl with it!
How To Use Transfer Tape Cricut : Then peel off the transfer tape you just laid down — it should peel up your vinyl with it!. Learn more about the newest, most glamorous member of the cricut vinyl family! When creating vinyl transfers with your cricut machine, cricut transfer tape is an essential! Turn your vinyl over and burnish the back side. This is so helpful for adhesive vinyl projects! Now line up your transfer tape and vinyl where you'd like it on your project material (for me, this is the pane of glass).
Use a scraper to burnish transfer tape onto your design, working outward from where you attached the small area. Emma talks about the importance of using the correct transfer tape, as it comes in two types, standard grip and strong grip which both serve. Place your vinyl over your project material. But i prefer to use clear shelf liner that you can find at places like walmart. You can see more about cutting and weeding vinyl in this post.
How To Use Cricut Smart Vinyl With Cricut Joy Happiness Is Homemade from i1.wp.com Touch device users, explore by touch or with swipe. I like to lay the transfer tape down on my table, face up. How to use transfer tape with cricut vinyl. For use with all cricut cutting machines. Now line up your transfer tape and vinyl where you'd like it on your project material (for me, this is the pane of glass). Use a scraper to burnish transfer tape onto your design, working outward from where you attached the small area. You can then peel the transfer tape up, bringing the decal with it and off of the backing. A craft stick, butter knife, or the scraper from the cricut tool kit can be used to do this!
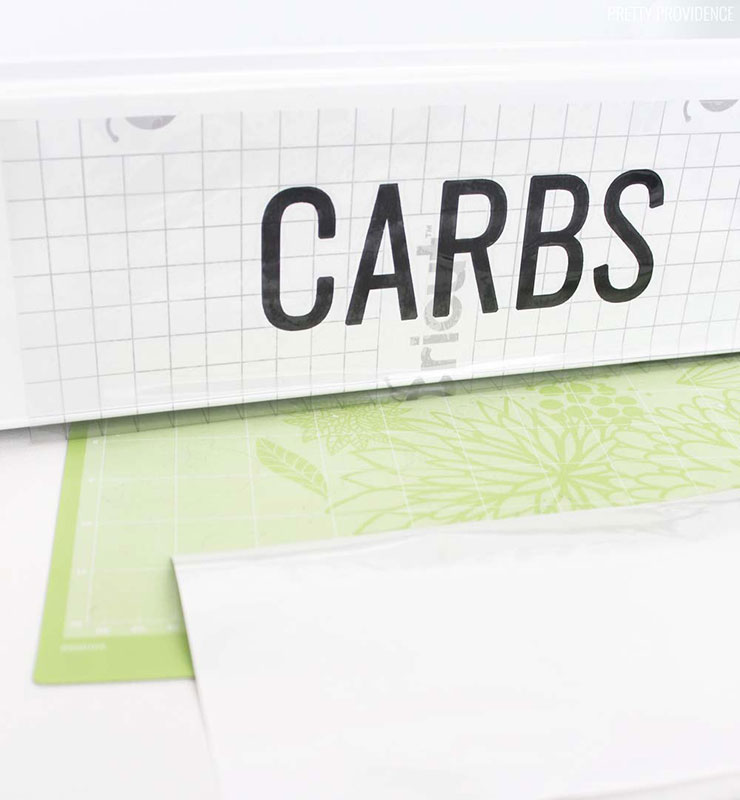
Then weed away all of the excess around your design.
Flipping the entire thing over and burnishing from the back twice. Cut your design out of adhesive vinyl with your cricut machine weed away all excess vinyl leaving behind only your design apply transfer tape over top of your design slowly, burnishing as you go remove vinyl backing paper Gently place the tape over your cut image. Adding the transfer tape to the top then burnishing over the top twice with a wide scraper. This is so helpful for adhesive vinyl projects! To start, after you weed your project, apply the transfer tape to the front of the vinyl. Cricut® glitter vinyl lets you create easily removable glitter stickers and decals, lettering, wall décor, and more for a variety of beautiful projects. Transfer your custom vinyl cuts to a variety of surfaces with ease and precision. To help you understand why the transfer tape is so important to your label, the following is how to use cricut transfer tape step by step: Use it to create shimmering media covers, labels, decor, and more. See how easy it is to use silhouette adhesive vinyl to customize countless diy projects!shop silhouette vinyl and transfer tape: This stuff is amazing and will save your sanity! Place your vinyl over your project material.
Transfer your custom vinyl cuts to a variety of surfaces with ease and precision. This is so helpful for adhesive vinyl projects! Use a scraper to burnish transfer tape onto your design, working outward from where you attached the small area. Your decal has now moved to the transfer paper and is ready to be carried to your project surface. Start in the middle and move outwards.
Tips For Using Transfer Tape Cricut from inspirationcontent.cricut.com Then weed away all of the excess around your design. You can then peel the transfer tape up, bringing the decal with it and off of the backing. Cutting vinyl with the cricut explore is very easy, but weeding it and applying it to a surface can be confusing. Using a scraper, burnishing tool, or side of a credit card, press the transfer tape onto the vinyl so that it sticks really well. After preparing the adhesive vinyl to be used, cut a piece of transfer tape that is slightly. Learn how to get the most out of yours with our simple tutorial. This specially designed transfer tape is made for most vinyl types, including premium vinyl™, patterned, holographic, holographic sparkle, metallic, matte metallic, and many more. How to use transfer tape with cricut vinyl.
Once the vinyl is cut the excess vinyl is removed (weeded) and the project should be left on the backing.
Now line up your transfer tape and vinyl where you'd like it on your project material (for me, this is the pane of glass). Burnish (rub) the tape onto the vinyl. I like to lay the transfer tape down on my table, face up. A craft stick, butter knife, or the scraper from the cricut tool kit can be used to do this! After cutting this vinyl decal with the cr. How to use transfer tape start by cutting a design from adhesive vinyl with your cricut machine. You can see more about cutting and weeding vinyl in this post. Adding the transfer tape to the top then burnishing over the top twice with a wide scraper. Use it to create shimmering media covers, labels, decor, and more. Then adding to the front of a shadowbox where the glass has been cleaned with rubbing alcohol and dried. When creating vinyl transfers with your cricut machine, cricut transfer tape is an essential! Attach a small area of transfer tape to your design. Use a scraper to burnish transfer tape onto your design, working outward from where you attached the small area.
Then adding to the front of a shadowbox where the glass has been cleaned with rubbing alcohol and dried. Transfer tape is only used on adhesive craft vinyl. This is so helpful for adhesive vinyl projects! Now line up your transfer tape and vinyl where you'd like it on your project material (for me, this is the pane of glass). A craft stick, butter knife, or the scraper from the cricut tool kit can be used to do this!
How To Use Transfer Tape For Cricut And Silhouette Projects from i0.wp.com Gently place the transfer tape over your cut image. After preparing the adhesive vinyl to be used, cut a piece of transfer tape that is slightly. Make sure that your transfer tape is not kinked in any way or you might mess up your project. Learn how to use transfer tape with your vinyl projects.big and small! Touch device users, explore by touch or with swipe. Turn your vinyl over and burnish the back side. When creating vinyl transfers with your cricut machine, cricut transfer tape is an essential! How to use glitter vinyl and strong grip transfer tape.
This can either be the center or one end of your design.
Make sure that your transfer tape is not kinked in any way or you might mess up your project. Using the same sheet of removable cricut vinyl cut into the same shape and weeded. (check the amazon price here) that is the best transfer tape for vinyl that i've found. Attach a small area of transfer tape to your design. Take your scraper or your roller and rub the vinyl on to the material, just like you did to get the vinyl from its backing to the transfer tape. How to use transfer tape start by cutting a design from adhesive vinyl with your cricut machine. Gently place the transfer tape over your cut image. Cutting vinyl with the cricut explore is very easy, but weeding it and applying it to a surface can be confusing. Unless you are transferring glitter vinyl, then you will need a special strong adhesive. Turn your vinyl over and burnish the back side. Then weed away all of the excess around your design. Learn how to use transfer tape with your vinyl projects.big and small! This is so helpful for adhesive vinyl projects!